In
this blog post I am going to describe about how to configure a WSO2
ESB cluster with WSO2 ELB and the WSO2 G-REG for a distributed
deployment in your production environment. Before continuing with
this post, you need to download the above mentioned products from the
WSO2 website.
WSO2
GREG - http://wso2.com/products/governance-registry/
Here
is the deployment diagram that we are going to configure. In this
setup, you have 3 ESB nodes with 1 manager node and 2 worker nodes, 1
ELB and 1 GREG instance.
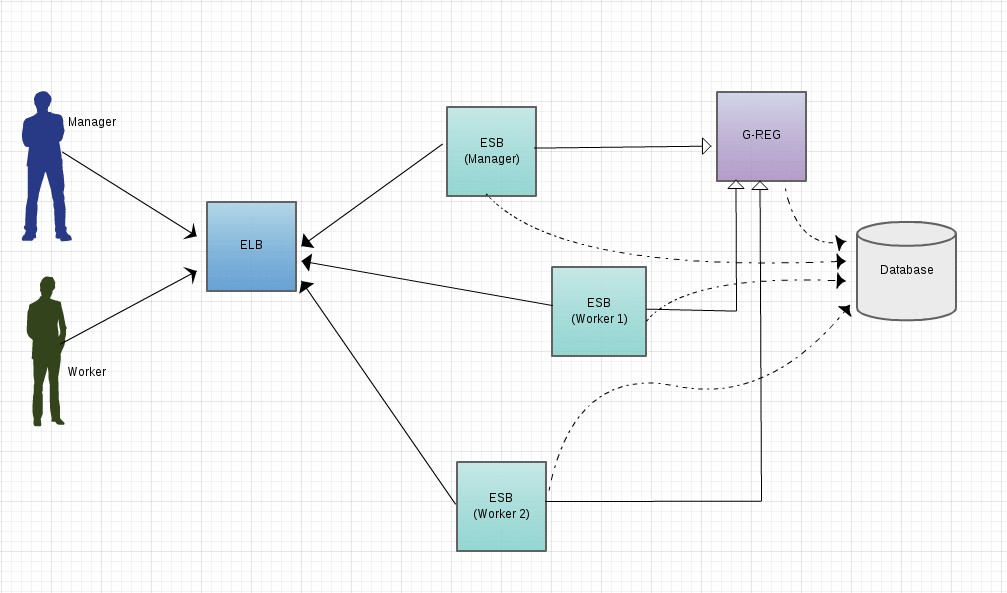
According
to the above diagram, you need to have 5 WSO2 servers and a database
to setup this deployment. Once you have downloaded the WSO2 products,
you need extract them to 5 locations. These locations will be
referred as follows.
ELB_HOME
/ ESB_MGR_HOME / ESB_WK1_HOME / ESB_WK2_HOME / GREG_HOME
Since
you are running all the servers in the same server, you need to make
sure the servers are run in different carbon offset ports.
WSO2
ELB - 0
WSO2
GREG - 1
WSO2
ESB_MGR - 2
WSO2
ESB_WK1 - 3
WSO2
ESB_WK2 - 4
1.
Configuring the ELB
- Open the <ELB_HOME>/repository/conf/loadbalancer.conf file.
- Locate the ESB configuration and edit it as follows:
esb
{
domains{
wso2.esb.domain {
tenant_range *;
group_mgt_port 5000;
domains{
wso2.esb.domain {
tenant_range *;
group_mgt_port 5000;
mgt
{
hosts
mgt.esb.cloud-test.wso2.com;
}
worker {
hosts esb.cloud-test.wso2.com;
}
}
}
}
worker {
hosts esb.cloud-test.wso2.com;
}
}
}
}
- Open the
<ELB_HOME>/repository/conf/axis2/axis2.xmlfile. - Locate the Clustering
section and verify or configure the properties as follows (some of
these properties are already set correctly by default):
- Enable clustering for this node:
<clustering class="org.wso2.carbon.core.clustering.hazelcast.HazelcastClusteringAgent" enable="true"> - Set the membership scheme to
wkato enable the Well Known Address registration method (this node will send cluster initiation messages to WKA members that we will define later):
<parameter name="membershipScheme">wka</parameter> - Specify a domain name for the ELB node (note that this domain it for potentially creating a cluster of ELB nodes and is not the cluster of ESB nodes that the ELB will load balance):
<parameter name="domain">wso2.carbon.lb.domain</parameter> - Specify the port used
to communicate with this ELB node:
<parameter name="localMemberPort">4000</parameter>carbon.xml. If this port number is already assigned to another server, the clustering framework will automatically increment this port number. However, if two servers are running on the same machine, you must ensure that a unique port is set for each server.
- <!-- The host name
or IP address of this member -->
We have now completed the clustering-related configuration for the ELB. In the next section, we will make one last change to the ELB that will increase usability.
Configuring the ELB to listen on default ports
We will now change the ELB configuration to listen to the default HTTP and HTTPS ports.- Open the
<ELB_HOME>/repository/conf/axis2/axis2.xmlfile. - Locate the Transport
Receiver section and configure the properties as follows:
- In the
<transportReceiver
  name="http"
  class="org.apache.synapse.transport.passthru.PassThroughHttpListener">
transport, enable service requests to be sent to the ELB's default HTTP port instead of having to specify port 8280:<parameter name="port">80</parameter> - In the
<transportReceiver
  name="https"
  class="org.apache.synapse.transport.passthru.PassThroughHttpSSLListener">
transport, enable service requests to be sent to the ELB's default HTTPS port instead of having to specify port 8243:
<parameter
  name="port">443</parameter>
Mapping the host name to the IP
In the ELB, we configured a host name inloadbalancer.conf
to front the worker service requests. We must now map this host name
(esb.cloud-test.wso2.com)
to the actual IP address. Open the server's /etc/hosts
file and add the following line, where <ELP-IP>
is the actual IP address:127.0.0.1 esb.cloud-test.wso2.com
127.0.0.1 mgt.esb.cloud-test.wso2.com
127.0.0.1 elb.wso2.com
127.0.0.1 mgt.esb.wso2.com
Starting the ELB server
Start the ELB server by typing the following command in the terminal:sudo -E sh <ELB_HOME>/bin/wso2server.sh
2.
Configuring the Databases for meta-data management and registry
mounting.
- Download and install the mysql server on your local machine.
- Create two databases for user management and shared governance and configuration registry with the following commands.
mysql
-u root -p
-
give your root password
drop
database wso2esbum_db;
drop
database wso2esbreg_db;
create
database wso2esbum_db;
use
wso2esbum_db;
source
ESB_MGR_HOME/dbscripts/mysql.sql;
create
database wso2esbreg_db;
use
wso2esbreg_db;
source
ESB_MGR_HOME/dbscripts/mysql.sql;
- Download the [1]MySQL jdbc driver zipped archive and unzip and copy the MySQL JDBC driver JAR (
mysql-connector-java-x.x.xx-bin.jar) to the<CARBON_HOME>/repository/component/libdirectory for 3 ESB and 1 GREG nodes.
<datasource>
<name>WSO2_CARBON_DB</name>
<description>The
datasource used for registry and user manager</description>
<jndiConfig>
<name>jdbc/WSO2CarbonDB</name>
</jndiConfig>
<definition
type="RDBMS">
<configuration>
<url>jdbc:mysql://localhost:3306/wso2esbreg_db</url>
<username>root</username>
<password>root</password>
<driverClassName>com.mysql.jdbc.Driver</driverClassName>
<maxActive>50</maxActive>
<maxWait>60000</maxWait>
<testOnBorrow>true</testOnBorrow>
<validationQuery>SELECT
1</validationQuery>
<validationInterval>30000</validationInterval>
</configuration>
</definition>
</datasource>
Here
you need to replace the username and password with the correct values
in your setup.
Because
we are running five Carbon-based products on the same server, we must
change the port offset to avoid port conflicts.
Open
<GREG_HOME>/repository/conf/carbon.xml.
Locate
the <Ports> tag and change the value of its sub-tag to:
<Offset>1</Offset>
- Start the Governance Registry server with -Dsetup so that all the required tables are created in the database. For example, in Linux
sh
wso2server.sh -Dsetup
The
Governance Registry server is now running with all required user
manager and registry tables for the server also created in
‘wso2esbreg_db’ database.
4.
Mounting the Governance Registry to ESB nodes
We
use the same datasource used for Governance Registry above as the
registry space of Carbon-based product instances.
Configure
<ESB_HOME>/repository/conf/datasource/master-datasources.xml as
below in all 3 ESB instances.
<datasource>
<name>WSO2_SHARED_REG_DB</name>
<description>The
datasource used for registry</description>
<jndiConfig>
<name>jdbc/WSO2_SHARED_REG_DB</name>
</jndiConfig>
<definition
type="RDBMS">
<configuration>
<url>jdbc:mysql://localhost:3306/wso2esbreg_db</url>
<username>root</username>
<password>root</password>
<driverClassName>com.mysql.jdbc.Driver</driverClassName>
<maxActive>50</maxActive>
<maxWait>60000</maxWait>
<testOnBorrow>true</testOnBorrow>
<validationQuery>SELECT
1</validationQuery>
<validationInterval>30000</validationInterval>
</configuration>
</definition>
</datasource>
Change
the username and password values of the relevant elements
accordingly.
Navigate
to the <ESB_ HOME>/repository/conf/registry.xml file and
specify the following configurations for all 3 ESB instances.
Add
a new db config to the datasource configuration done in step 3 above.
For example,
<dbConfig
name="remote_registry">
<dataSource>jdbc/WSO2_SHARED_REG_DB</dataSource>
</dbConfig>
Specify
the remote Governance Registry instance with the following
configuration:
<remoteInstance
url="https://localhost:9444/registry">
<id>instanceid</id>
<dbConfig>remote_registry</dbConfig>
<cacheId>root@jdbc:mysql://localhost:3306/registrydb</cacheId>
<readOnly>false</readOnly>
<enableCache>true</enableCache>
<registryRoot>/</registryRoot>
</remoteInstance>
Define
the registry partitions using the remote Governance Registry
instance. In this deployment strategy, we are mounting the config and
governance partitions of the ESB instances to the remote Governance
Registry instance.
<mount
path="/_system/config" overwrite="true">
<instanceId>instanceid</instanceId>
<targetPath>/_system/esbnodes</targetPath>
</mount>
<mount
path="/_system/governance" overwrite="true">
<instanceId>instanceid</instanceId>
<targetPath>/_system/governance</targetPath>
</mount>
5.
Configure the user management database to point to the mysql
database.
To
configure the user management database edit
<ESB_HOME>/repository/conf/datasoruces/master-datasources.xml
as shown below in all 3 ESB nodes.
<datasource>
<name>WSO2_UM_DB</name>
<description>The
datasource used for registry and user manager</description>
<jndiConfig>
<name>jdbc/WSO2UmDB</name>
</jndiConfig>
<definition
type="RDBMS">
<configuration>
<url>jdbc:mysql://localhost:3306/wso2esbum_db</url>
<username>root</username>
<password>root</password>
<driverClassName>com.mysql.jdbc.Driver</driverClassName>
<maxActive>50</maxActive>
<maxWait>60000</maxWait>
<testOnBorrow>true</testOnBorrow>
<validationQuery>SELECT
1</validationQuery>
<validationInterval>30000</validationInterval>
</configuration>
</definition>
</datasource>
Make
sure to replace username and password with your MySQL database
username and password.
To
configure the datasource, update the dataSource property found in
<ESB_MGR_HOME>/repository/conf/user-mgt.xml as shown below in
all 3 esb nodes.
<Property
name="dataSource">jdbc/WSO2UmDB</Property>
6.
Configuring the Manager node
Configuring
clustering for the manager node is similar to the way you configured
it for the ELB node, but the localMemberPort is 4100 instead of 4000,
and you define the ELB node instead of the ESB manager node as the
well-known member.
- Open the <ESB_MGR_HOME>/repository/conf/axis2/axis2.xml file.
Locate
the Clustering section and verify or configure the properties as
follows (some of these properties are already set correctly by
default):
Enable
clustering for this node:
<clustering
class="org.wso2.carbon.core.clustering.hazelcast.HazelcastClusteringAgent"
enable="true">
Set
the membership scheme to wka to enable the Well Known Address
registration method (this node will send cluster initiation messages
to WKA members that we will define later):
<parameter
name="membershipScheme">wka</parameter>
Specify
the name of the cluster this node will join:
<parameter
name="domain">wso2.esb.domain</parameter>
Specify
the port used to communicate cluster messages:
<parameter
name="localMemberPort">4100</parameter>
Note:
This port number will not be affected by the port offset in
carbon.xml. If this port number is already assigned to another
server, the clustering framework will automatically increment this
port number. However, if two servers are running on the same machine,
you must ensure that a unique port is set for each server.
<parameter
name="localMemberHost">mgt.esb.wso2.com</parameter>
<parameter
name="properties">
<property
name="backendServerURL"
value="https://${hostName}:${httpsPort}/services/"/>
<property
name="mgtConsoleURL"
value="https://${hostName}:${httpsPort}/"/>
<!-- Manger Setup with Port Mapping-->
<property name="port.mapping.80" value="9765"/>
<property
name="port.mapping.443" value="9445"/>
<property
name="subDomain" value="mgt"/>
<!-- Worker Setup-->
<!--property name="subDomain" value="worker"/-->
</parameter>
<!--
The
list of static or well-known members. These entries will only be
valid if the
"membershipScheme"
above is set to "wka"
-->
<members>
<member>
<hostName>elb.wso2.com</hostName>
<port>5000</port>
</member>
</members>
Because
we are running five Carbon-based products on the same server, we must
change the port offset to avoid port conflicts. Additionally, we will
add the cluster host name so that any requests sent to the manager
host are redirected to the cluster, where the ELB will pick them up
and manage them.
Open
<ESB_MGR_HOME>/repository/conf/carbon.xml.
Locate
the <Ports> tag and change the value of its sub-tag to:
<Offset>2</Offset>
Also
change the management host name as below.
<MgtHostName>mgt.esb.wso2.com</MgtHostName>
Enabling
DepSync on the manager node
You
configure DepSync in the carbon.xml file by making the following
changes in the <DeploymentSynchronizer> tag:
<DeploymentSynchronizer>
<Enabled>true</Enabled>
<AutoCommit>true</AutoCommit>
<AutoCheckout>true</AutoCheckout>
<RepositoryType>svn</RepositoryType>
<SvnUrl>https://svn.example.com/depsync.repo/</SvnUrl>
<SvnUser>repouser</SvnUser>
<SvnPassword>repopassword</SvnPassword>
<SvnUrlAppendTenantId>true</SvnUrlAppendTenantId>
</DeploymentSynchronizer>
Here
you need to provide a valid url for the svn location and username and
password. You can follow this link to create a local svn repo.
You
need to copy the [1]svnClientBundle-1.0.0.jar file and
[2]trilead-ssh2-1.0.0-build215.jar file in to
repository/components/lib folder after configuring the depsync.
Start
the ESB server by typing the following command in the terminal:
sh
<ESB_MGR_HOME>/bin/wso2server.sh -Dsetup
7.
Configuring the Worker Nodes
Configuring
clustering for the worker nodes is similar to the way you configured
it for the manager node, but the localMemberPort will vary for each
worker node, you add the subDomain property, and you add the ELB and
ESB manager node to the well-known members, as described in the
following steps.
- Open the <ESB_HOME>/repository/conf/axis2/axis2.xml file.
Locate
the Clustering section and verify or configure the properties as
follows (some of these properties are already set correctly by
default):
- Enable clustering for this node:
<clustering
class="org.wso2.carbon.core.clustering.hazelcast.HazelcastClusteringAgent"
enable="true">
- Set the membership scheme to wka to enable the Well Known Address registration method (this node will send cluster initiation messages to WKA members that we will define later):
<parameter
name="membershipScheme">wka</parameter>
- Specify the name of the cluster this node will join:
<parameter
name="domain">wso2.esb.domain</parameter>
- Specify the port used to communicate cluster messages
<parameter
name="localMemberPort">4101</parameter>
- Define the sub-domain as worker by adding the following property under the <parameter name="properties"> element:
<property
name="subDomain" value="worker"/>
Define
the ELB and manager nodes as well-known members of the cluster by
providing their host name and localMemberPort values. The manager
node is defined here because it is required for the Deployment
Synchronizer to function.
<members>
<member>
<hostName>elb.wso2.com</hostName>
<port>5000</port>
</member>
<member>
<hostName>mgt.esb.wso2.com</hostName>
<port>4100</port>
</member>
</members>
Because
we are running five Carbon-based products on the same server, we must
change the port offset to avoid port conflicts. Additionally, we will
add the cluster host name so that any requests sent to the manager
host are redirected to the cluster, where the ELB will pick them up
and manage them.
Open
<ESB_WK1_HOME>/repository/conf/carbon.xml.
Locate
the <Ports> tag and change the value of its sub-tag to:
<Offset>3</Offset>
You
configure DepSync in the carbon.xml file by making the following
changes in the <DeploymentSynchronizer> tag:
<DeploymentSynchronizer>
<Enabled>true</Enabled>
<AutoCommit>false</AutoCommit>
<AutoCheckout>true</AutoCheckout>
<RepositoryType>svn</RepositoryType>
<SvnUrl>https://svn.example.com/depsync.repo/</SvnUrl>
<SvnUser>repouser</SvnUser>
<SvnPassword>repopassword</SvnPassword>
<SvnUrlAppendTenantId>true</SvnUrlAppendTenantId>
</DeploymentSynchronizer>
Here
you need to provide a valid url for the svn location and username and
password. You can follow this link to create a local svn repo.
You
need to copy the [1]svnClientBundle-1.0.0.jar file and
[2]trilead-ssh2-1.0.0-build215.jar file in to
repository/components/lib folder after configuring the depsync.
Start
the ESB server by typing the following command in the terminal:
sh
<ESB_WK1_HOME>/bin/wso2server.sh -DworkerNode=true
Do
the same config changes to the ESB_WK2 node and change the
localMemberPort value to 4102 in the axis2.xml file and port offset
to 4 in the carbon.xml file and enable the depsync as mentioned in
above step.
Start
the ESB server by typing the following command in the terminal:
sh
<ESB_WK2_HOME>/bin/wso2server.sh -DworkerNode=true
Now
the setup is completed and you can access the management console with
the following url.
you
can access the proxy services deployed in the ESB with the following
url.
Navigate
to the registry browser in the ESB management console and note the
config and governance partitions indicating successful mounting to
the remote registry instance with an arrow.
.
Hi Fernando,
ReplyDeletegreat work!
I have 2 questions:
1-Why I must define the management node in the clustering of the workers? The wso2 docs say "The manager node is defined here because it is required for the Deployment Synchronizer to function", i am using DepSynch with svn and dont have not defined it, and all seems to work ....
2-Cannot access workers console (in Carbon 4.0.0 I access it): is this intentional or something is wrong?
TK in advance