WSO2 ESB is arguably the highest performing open source ESB available in the industry. It has been tested and deployed in various enterprise environments with serving zillions of transactions. The ultimate reason behind this resounding success is it's high performance HTTP transport implementation known as Pass-Through Transport which provides efficient mechanism to process client requests in a highly concurrent scenarios. In this blog post/s we are going to give you some introduction in to PTT by covering some of the theories behind this implementation. The actual implementation is far more complex than described in this tutorial and I have added some useful resources whenever possible to provide you more information.
Most of the content present in this tutorial are extracted from following blog posts/tutorials on the web. I would like to give credit to those authors for writing such great content.


Most of the content present in this tutorial are extracted from following blog posts/tutorials on the web. I would like to give credit to those authors for writing such great content.
Pass-Through transport uses the httpcore-nio library as the underlying implementation library which uses the java NIO api for the implementation. First we will go through the concepts of java NIO and then go through httpcore-nio concepts and finally the PTT implementation.
Java Non-blocking IO (NIO)
In the standard IO API you work with byte streams and character streams. In NIO you work with channels and buffers. Data is always read from a channel into a buffer, or written from a buffer to a channel. Java NIO enables you to do non-blocking input output. As an example, a thread can ask a channel to read data into a buffer. While the channel reads data in to the buffer, the thread can do something else. Once the data is read into the buffer, the thread can continue processing it. In standard IO, java uses byte streams and character streams. But in NIO, java uses channels and buffers. Data is always read from channel to buffer or write from a buffer to channel.
Channels
Java NIO Channels are similar to streams with a few differences:
- You can both read and write to a Channels. Streams are typically one-way (read or write).
- Channels can be read and written asynchronously.
- Channels always read to, or write from, a Buffer.
As mentioned above, you read data from a channel into a buffer, and write data from a buffer into a channel. Here are the most important Channel implementations in Java NIO:
FileChannel - The FileChannel reads data from and to files.
DatagramChannel - The DatagramChannel can read and write data over the network via UDP.
SocketChannel - The SocketChannel can read and write data over the network via TCP.
ServerSocketChannel - The ServerSocketChannel allows you to listen for incoming TCP connections, like a web server does. For each incoming connection a SocketChannel is created.
Buffers
Buffers are used when interacting with NIO channels. Buffer is a block of memory into which data can be written and later can read from. Buffer provides set of methods which makes it easier to work with the memory block.
Using a Buffer to read and write data typically follows this little 4-step process:
1 Write data into the Buffer
2 Call buffer.flip()
3 Read data out of the Buffer
4 Call buffer.clear() or buffer.compact()
When you write data into a buffer, the buffer keeps track of how much data you have written. Once you need to read the data, you need to switch the buffer from writing mode into reading mode using the flip() method call. In reading mode the buffer lets you read all the data written into the buffer.
Selectors
A selector is an object that can monitor multiple channels for events. Therefore, a single thread can monitor multiple channels for data. A Selector allows a single thread to handle multiple Channels. This is a very useful concept in cases where your application has many open connections but has low traffic on each connection. To use a Selector, you register the Channels with it. Then you call it’s select() method. This method will block until there is an event ready for one of the registered channels. Once the method returns, the thread can process the events.
Now we have the basic understanding about the concepts related to Java NIO and let's take a look at the actual problem we are going to solve with this technology.
Network services and Reactor pattern
Web services, Distributed Objects, etc Most have same basic structure:
- Read request
- Decode request
- Process service
- Encode reply
- Send reply
But differ in nature and cost of each step.
XML parsing, File transfer, Web page generation, computational services
In a classical server design, there will be new handler thread for each client connection.
This approach makes following scalability challenges.
- Graceful degradation under increasing load (more clients)
- Continuous improvement with increasing resources (CPU, memory, disk, bandwidth)
- Also meet availability and performance goals
- Short latencies
- Meeting peak demand Tunable quality of service
Divide processing into small tasks makes it more effective when processing high and variable loads.
- Each task performs an action without blocking
- Execute each task when it is enabled Here, an IO event usually serves as trigger
- Basic mechanisms supported in java.nio Non-blocking reads and writes
- Dispatch tasks associated with sensed IO events
- Usually more efficient than alternatives Fewer resources
- Don't usually need a thread per client Less overhead
- Less context switching, often less locking But dispatching can be slower
- Must manually bind actions to events Usually harder to program
- Must break up into simple non-blocking actions
- Similar to GUI event-driven actions
- Cannot eliminate all blocking: GC, page faults, etc
- Must keep track of logical state of service
According to the above comparison, we can clearly see that dividing the task in to small non-blocking small operations make it more efficient. But programming this model is more complex than the first approach. Reactor pattern is used to implement this behavior.
Reactor pattern
Basic reactor pattern can be depicted with the below diagram.
A Reactor runs in a separate thread and its job is to react to IO events by dispatching the work to the appropriate handler. Its like a telephone operator in a company who answers the calls from clients and transfers the communication line to the appropriate receiver.
A Handler performs the actual work to be done with an IO event similar to the actual officer in the company the client who called wants to speak to.
Selection Keys maintain IO event status and bindings. Its a representation of the relationship between a Selector and a Channel. By looking at the Selection Key given by the Selector, the Reactor can decide what to do with the IO event which occurs on the Channel.
Here, there is a single ServerSocketChannel which is registered with a Selector. The SelectionKey 0 for this registration has information on what to do with the ServerSocketChannel if it gets an event. Obviously the ServerSocketChannel should receive events from incoming connection requests from clients. When a client requests for a connection and wants to have a dedicated SocketChannel, the ServerSocketChannel should get triggered with an IO event. What does the Reactor have to do with this event? It simply has to Accept it to make a SocketChannel. Therefore SelectionKey 0 will be bound to an Acceptor which is a special handler made to accept connections so that the Reactor can figure out that the event should be dispatched to the Acceptor by looking at SelectionKey 0. Notice that ServerSocketChannel, SelectionKey 0 and Acceptor are all in same colour ( light green )
The Selector is made to keep looking for IO events. When the Reactor calls Selector.select() method, the Selector will provide a set of SelectionKeys for the channels which have pending events. When SelectionKey 0 is selected, it means that an event has occurred on ServerSocketChannel. So the Reactor will dispatch the event to the Acceptor.
When the Acceptor accepts the connection from Client 1, it will create a dedicated SocketChannel 1 for the client. This SocketChannel will be registered with the same Selector with SelectionKey 1. What would the client do with this SocketChannel? It will simply read from and write to the server. The server does not need to accept connections from client 1 any more since it already accepted the connection. Now what the server needs is to Read and Write data to the channel. So SelectionKey 1 will be bound to Handler 1 object which handles reading and writing. Notice that SocketChannel 1, SelectionKey 1 and Handler 1 are all in Green.
The next time the Reactor calles Selector.select(), if the returned SelectionKey Set has SelectionKey 1 in it, it means that SocketChannel 1 is triggered with an event. Now by looking at SelectionKey 1, the Reactor knows that it has to dispatch the event to Handler 1 since Hander 1 is bound to SelectionKey 1. If the returned SelectionKey Set has SelectionKey 0 in it, it means that ServerSocketChannel has received an event from another client and by looking at the SelectionKey 0 the Reactor knows that it has to dispatch the event to the Acceptor again. When the event is dispatched to the Acceptor it will make SocketChannel 2 for client 2 and register the socket channel with the Selector with SelectionKey 2.
So in this scenario we are interested in 3 types of events.
1 Connection request events which get triggered on the ServerSocketChannel which we need to Accept.
2 Read events which get triggerd on SocketChannels when they have data to be read, from which we need to Read.
3 Write events which get triggered on SocketChannels when they are ready to be written with data, to which we need to Write.
This is the theory behind the reactor pattern and this pattern is implemented in the apache httpcore-nio library. WSO2 ESB PTT uses this library as the underlying realization of the reactor pattern.
This gives a basic understanding about the reactor pattern and Java NIO framework. Let’s map this knowledge to Passthrough transport implementation of WSO2 ESB.
You need to download following items before we continue debugging the code.
WSO2 ESB 4.8.1 - http://wso2.com/products/enterprise-service-bus/
Apache-Synapse Source - https://svn.wso2.org/repos/wso2/carbon/platform/tags/turing-chunk07/dependencies/synapse/2.1.2-wso2v4/
Http-Core-NIO Source - https://svn.wso2.org/repos/wso2/carbon/platform/tags/turing-chunk07/dependencies/httpcore-nio/4.2.3-wso2v3/
Apache axis2 core source - https://svn.wso2.org/repos/wso2/carbon/kernel/tags/4.2.0/dependencies/axis2/1.6.1-wso2v10/
Apache axis2 transports source - https://svn.wso2.org/repos/wso2/carbon/kernel/tags/4.2.0/dependencies/transports/1.1.0-wso2v9/
Once you download all the components, extract the ESB 4.8.1 distribution to a location (ESB_HOME) and then import the maven projects to your favorite IDE (Intellij Idea or Eclipse) and create a remote debugging configuration (with port 5005) to debug in to the source code.
Then start the ESB with the following command
sh ESB_HOME/bin/wso2server.sh -debug 5005
This will start the ESB in the debug mode and now you can start your remote debugging session from your IDE. Once it is connected with the ESB, it will startup the server. During the server startup, you can observe the following INFO logs printed in the console.
[2015-04-04 13:54:48,996] INFO - PassThroughHttpSSLSender Pass-through HTTPS Sender started...
[2015-04-04 13:54:48,996] INFO - PassThroughHttpSender Initializing Pass-through HTTP/S Sender...
[2015-04-04 13:54:48,998] INFO - PassThroughHttpSender Pass-through HTTP Sender started...
[2015-04-04 13:54:54,370] INFO - PassThroughHttpSSLListener Initializing Pass-through HTTP/S Listener...
[2015-04-04 13:54:56,114] INFO - PassThroughHttpListener Initializing Pass-through HTTP/S Listener…
The above log lines will confirm that 4 main components of the ESB message flow has been started with the server startup. These transport listener and sender classes are configured in the axis2.xml file.
PassThroughHttpSSLSender - ( HTTPS transport for sending messages from ESB to back end )
PassThroughHttpSender - ( HTTP transport for sending messages from ESB to back end )
PassThroughHttpSSLListener - ( HTTPS transport for receiving messages to ESB from clients )
PassThroughHttpListener - ( HTTP transport for receiving messages to ESB from clients )
During the server startup, these components will be started from the CarbonServerManager class.
Let’s add some debug point in to PassThroughHttpListener class (#init method) and see what is happening inside this class initialization.
Within the init() method of this class, it creates the following 3 major objects.
ServerConnFactory - Factory class for creating connections
SourceHandler - This is the class where transport interacts with the client. This class receives events for a particular connection. These events give information about the message and its various states.
ServerIODispatch - This class receives various events from http core and dispatch them to PTT level code (SourceHandler)
connFactory = connFactoryBuilder.build(sourceConfiguration.getHttpParams());
handler = new SourceHandler(sourceConfiguration);
ioEventDispatch = new ServerIODispatch(handler, connFactory);
Within the start() method, it creates Reactor object with a thread group and calls the execute() method within a separate thread.
This will call the execute method of the AbstractMultiworkerIOReactor(httpcore-nio) class in which it will start N number of Worker threads (N equals to number of cores in the processor) with the prefix HTTP-Listener I/O dispatcher. After starting these worker threads, this class will go in to infinite loop to process the events received by the selector. Within this loop, it will process all the connection requests from the clients. This class acts as the Acceptor of the reactor pattern. It will create a new socketChannel and add that to the channel list of the dispatcher object.
These worker threads will execute the execute() method of the BaseIOReactor class which eventually calls the AbstractIOReactor class’s execute method. This will execute infinite for loop for processing the IO events. Within this infinite loop, it will first process the existing events which can be processed (ex: events of already registered channels which can accept events). After processing, it will check for new channels added and create sessions for newly added channels for future processing.
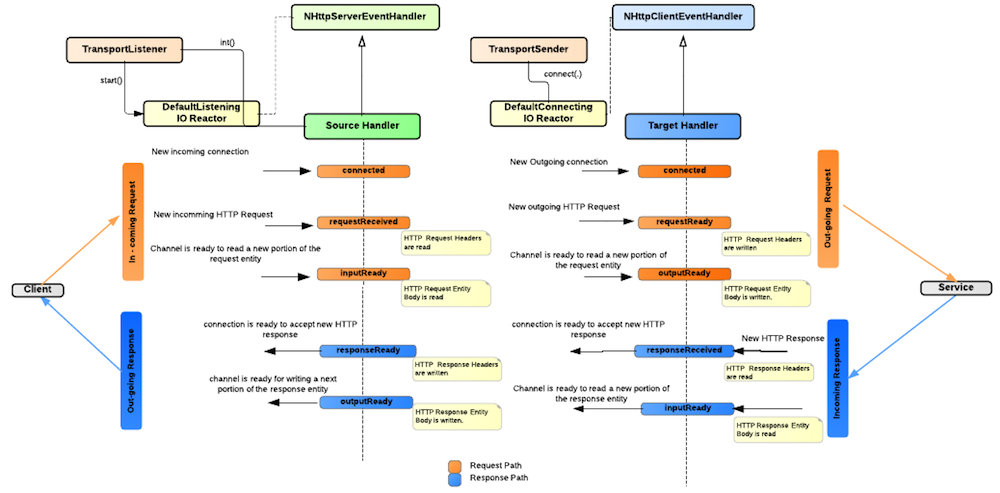
Now we have an understanding about how the requests are processed at the http core level. Once the client sends an http request to the ESB, it will trigger a series of events at the IO level within the ESB server side. This series of events is modeled in to a state machine within the http core level.
Converting of incoming events to this state machine is done within the http core level.
- client sends a request to the ESB. This will be picked by the AbstractMultiworkerIOReactor thread and create a new socketChannel for this request and add this channel to reactor threads channel list and notify the selector (wakeup()).
- Once this notification is received by the worker thread, it will execute the processNewChannells() method within the AbstractIOReactor and During this process it will create a new HTTP session and call the Connected method on the SourceHandler (State Connected)
- Then it will go into the processEvents() method of the AbstractIOReactor class and process the remaining IO events for this channel. During this process it will consume the incoming message and change the state and call the requestReceived method from DefaultNHttpServerConnection class. This will also call the inputReady method.
When sending a request from ESB to back end server, message flow is mentioned below.
Message flow should contain either send or call mediator to send a message to a back end server. From either of this mediators, it calls the
Axis2SynapseEnvironment.send()
Axis2Sender.sendon()
Axis2FlexibleMEPClient.send()
OperationClient.execute()
OutInOperationClient.executeImpl()
AxisEngine.send()
PassThroughHttpSender.invoke()
DeliveryAgent.submit()
TargetConnections.getConnection()
DefaultConnectingIOReactor.connect()
requestQueue.add()
selector.wakeup()
DefaultConnectingIOReactor.processEvents()
DefaultConnectingIOReactor.processSessionRequests()
DefaultConnectingIOReactor.processEvent()
AbstractIOReactor.processNewChannels()
BaseIOReactor.sessionCreated()
AbstractIODispatch.connected()
ClientIODispatch.onConnected()
TargetHandler.Connected()
Detailed description about the internal state transition could be found in the following article.
This will give you some understanding about the PTT implementation. Idea of this blog post is to give you a starting point to study about the complex implementation of PTT. Here are some important links to study more about the PTT.
Java NIO -
Reactor pattern -
Pass-Through transport
Needed to compose you a very little word to thank you yet again regarding the nice suggestions you’ve contributed here
ReplyDeleteThank you. Your blog was very helpful and efficient For Me,Thanks for Sharing the information Regards AWS Online Training
Thanks for sharing such a good and informative content to all of us
ReplyDeleteMulesoft Online Training
Mulesoft Online Training in Hyderabad